

The Engineering Compromise Inside Your MacBook
The transition to Apple Silicon marked a paradigm shift in mobile computing efficiency. The M1 chip delivers performance metrics that challenge high-end desktop workstations while consuming a fraction of the power. However, to achieve the sleek, silent aesthetic that defines the MacBook line, engineers made a calculated compromise regarding thermal management. The active cooling system is strictly reserved for the System on Chip, leaving the rest of the logic board in a state of thermal isolation.
This design philosophy works perfectly for casual users who browse the web or write emails. But for the professional, the video editor, the software developer, or the heavy multitasker, this minimalist approach creates a hidden liability. The power delivery circuits and storage controllers operate in a stagnant air pocket, relying solely on passive convection. Over time, this trapped heat does not just throttle performance; it actively degrades the chemical structure of the adjacent lithium-polymer battery cells.
Strategic Design Philosophy: Why Apple Left It Passive
A common question arises: “If this thermal bridge is so effective, why didn’t Apple implement it at the factory?” The answer lies in consumer behavior prioritization rather than cost-cutting. Apple engineers prioritize acoustics and “lap comfort” above internal component longevity.
Connecting the heat-generating components to the chassis would turn the bottom of the laptop into a radiator. While this is thermally superior for the electronics, it creates a user experience issue where the device feels uncomfortably hot on the user’s lap. Furthermore, keeping the thermal solution passive reduces support complexity; there are no dust filters to clean for these components, and no risk of thermal paste pump-out over time. For the average consumer, Apple’s choice is logical. For the power user, it is a limitation that must be addressed.
The Physics of Thermal Interface Materials
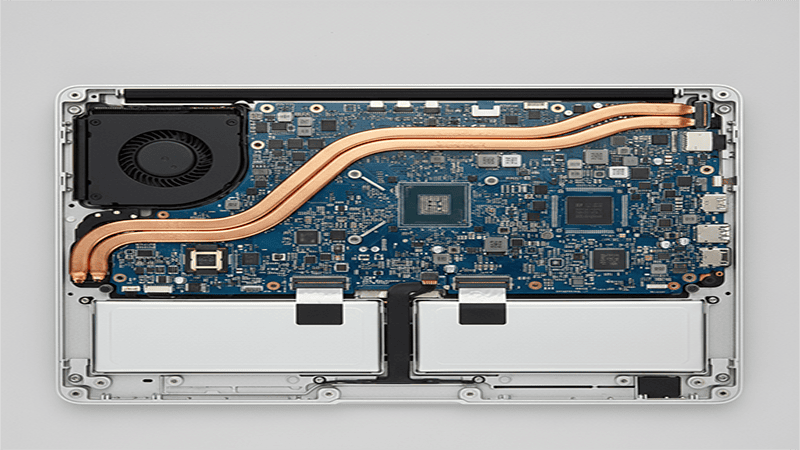
To understand why this modification is necessary, one must look at the microscopic level of heat transfer. Heat moves most efficiently through conduction, where kinetic energy is transferred between adjacent atoms. As seen in detailed logic board teardowns by experts like iFixit, the gap between the MacBook’s components and the aluminum chassis is approximately 1.5mm to 2.0mm. Air is a thermal insulator, meaning it resists this transfer of energy.
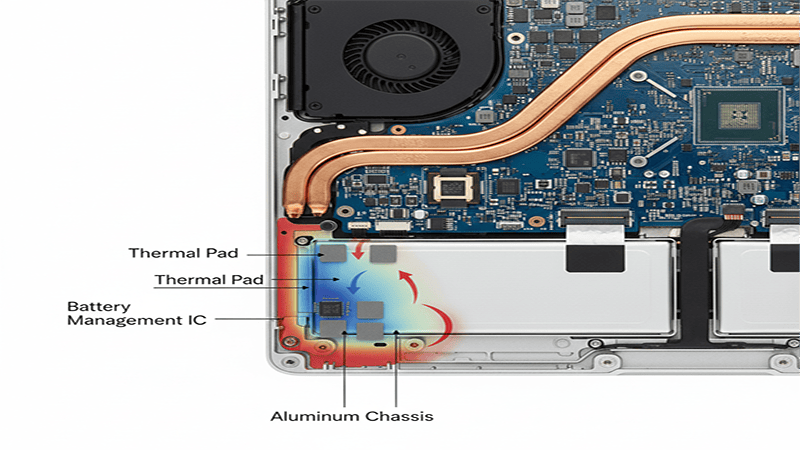
By introducing a high-performance thermal interface material, we displace this insulating air with a conductive medium. This effectively couples the heat-generating components to the largest metal object available: the laptop’s unibody chassis. The aluminum case transforms from a passive protective shell into an active heat dissipation surface, dramatically increasing the system’s total thermal mass.
The Manufacturing Reality and Quality Control Risks
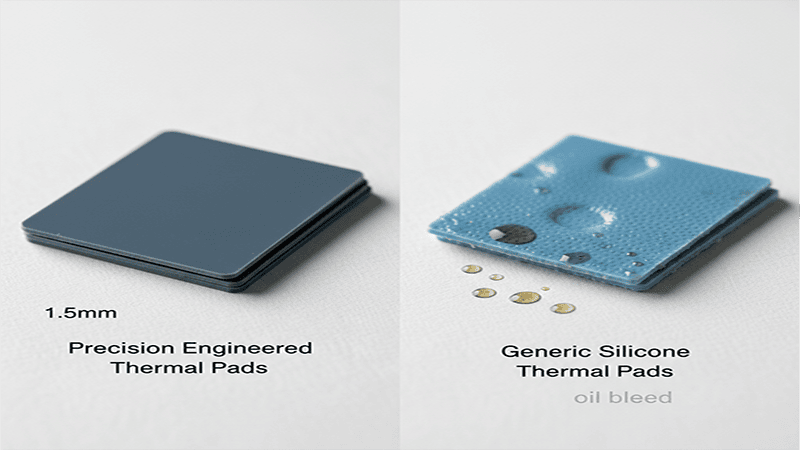
The marketplace is flooded with generic thermal pads that promise high performance at rock-bottom prices. As a manufacturer committed to industrial-grade standards, Jiujutech understands that the difference between a safe modification and a damaged logic board lies in manufacturing precision.
The Precision Paradox
In the world of ultra-thin electronics, tolerance is everything. A deviation of just 0.1mm can be catastrophic. Generic manufacturing processes often suffer from poor calendering control, leading to pads that vary significantly in thickness across a single sheet. If a user installs a pad that is slightly too thick into a MacBook with tight assembly tolerances, the resulting mechanical pressure is transferred directly to the solder joints of the logic board. This can cause ball grid array fractures or micro-cracks in the PCB traces. Jiujutech mitigates this risk by enforcing strict digital micrometer verification on every production batch, ensuring pads sit at the lower bound of the tolerance range for safety.
Lessons from the Lab: Our Early Engineering Misjudgments
We believe transparency builds trust. In our initial V1 prototype for the M1 MacBook Pro, we made the mistake of chasing maximum compression. We utilized a 2.0mm pad on the Battery Management Unit, assuming that higher compression equals better thermal transfer. While the thermal results were excellent, the mechanical side effects were unacceptable.
We discovered that this thickness introduced a localized logic board flex of approximately 0.05mm. While invisible to the naked eye, this pressure was transmitted through the chassis to the trackpad mechanism, increasing the click actuation force by 15 grams and making the trackpad feel “stiff” near the center. We immediately scrapped the V1 design and recalibrated our tooling to produce a custom 1.5mm specification with a softer Shore 30A hardness. This experience taught us that in unibody laptops, mechanical neutrality is just as important as thermal conductivity.
Chemical Stability and Oil Migration
Thermal pads are essentially a suspension of thermally conductive ceramic particles within a polymer matrix. To keep the pad soft and compliant, manufacturers use silicone oil. In cheap formulations, this oil is not chemically cross-linked to the polymer chain. When the laptop heats up during a render or export, the oil separates and bleeds out. This phenomenon, known as “pump-out” or “bleed,” can ruin optical sensors, degrade adhesive bonds inside the chassis, and permanently stain the screen’s anti-reflective coating. Our consumer electronics kits undergo rigorous baking tests to ensure the polymer matrix remains stable under long-term thermal cycling.
Foreign Object Debris Control
A single microscopic metal shaving embedded in a thermal pad can bridge two electrical contacts, creating a short circuit that destroys the logic board instantly. This is a common failure mode for pads cut in uncontrolled factory environments. We process our materials in clean-room conditions with visual inspection protocols derived from semiconductor manufacturing standards.
The Economics of Thermal Management
Beyond the technical benefits, there is a compelling economic argument for this modification. The most expensive consumable component in a modern MacBook is the battery assembly, which is glued to the top case. Replacing it out of warranty costs hundreds of dollars.
Lithium-ion batteries age through two mechanisms: cycling and calendar aging. However, according to data from Battery University, heat acts as a catalyst for both. By lowering the localized ambient temperature around the battery cells by 10°C to 15°C using thermal pads, you are essentially slowing down the chemical aging process. The cost of a precision thermal pad kit is a fraction of the cost of a premature battery replacement, offering a return on investment that pays off in device longevity and resale value.
Essential Tools for the Professional Protocol
Attempting this procedure with improvised tools increases the risk of stripping screws or damaging the chassis. The following toolkit is mandatory for a safe installation.
- P5 Pentalobe Driver: The proprietary screws used by Apple are made of soft aluminum. A high-quality driver prevents cam-out and stripped heads.
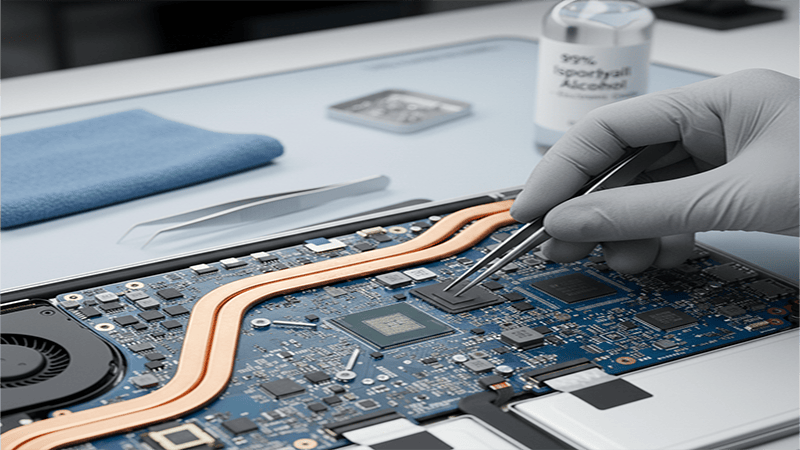
- Non-Conductive Probe: A nylon or plastic spudger is required to safely disconnect the battery data cable and release the internal retention clips without scratching the logic board.
- Cleaning Solvent: Isopropyl alcohol (90% concentration or higher) is necessary to remove manufacturing oils from the chips and chassis.
- Jiujutech Precision Thermal Pads:
- 1.5mm Thickness: Designated for the Battery Management Unit.
- 2.0mm Thickness: Designated for the NAND Flash and Controller.
- 1.0mm Thickness: Designated for Power MOSFETs.
Execution Protocol and Installation Logic
This guide outlines the specific steps for the 13-inch MacBook Pro M1 chassis. The principles apply to the Air, but thickness requirements will differ.
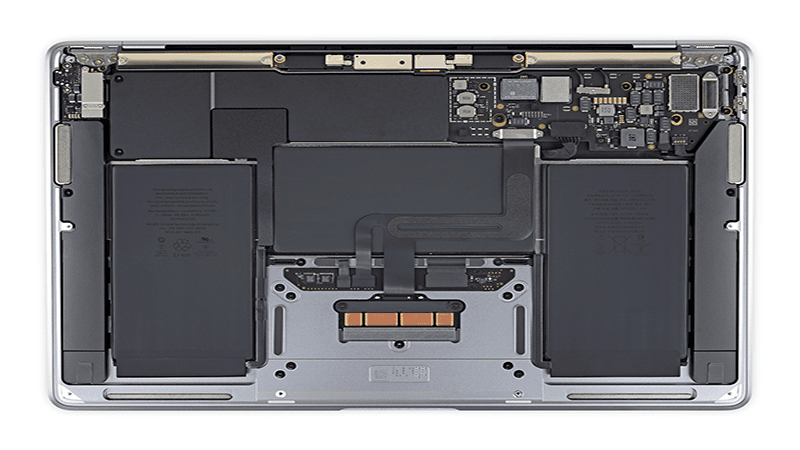
Case Removal and Screw Mapping
The bottom panel is secured by six screws and a series of internal clips. Crucially, the two screws located at the top center near the display hinge are shorter than the other four. It is vital to map these screws on a magnetic mat or piece of paper. Driving a long screw into a short standoff can puncture the palm rest from the inside out, causing permanent cosmetic damage.
Once the screws are removed, use a suction cup near the front lip to create a small gap. Insert the non-conductive probe and slide it along the side edges to disengage the snap clips. Do not pull the case straight up; pull it slightly toward the front of the machine to slide it out of the rear hinge hooks.
Surface Decontamination
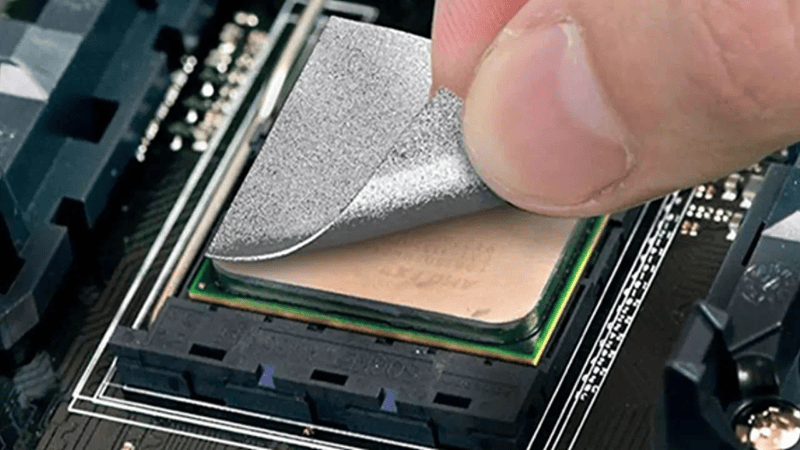
Factory-fresh logic boards often have a thin film of residue on the chip packages. Using a lint-free cloth and isopropyl alcohol, gently clean the top surfaces of the black silicon packages. Do the same for the corresponding areas on the inside of the aluminum bottom lid. This step is often skipped, but it is critical. Even a fingerprint can act as a thermal barrier, increasing the interface resistance and reducing the effectiveness of the modification.
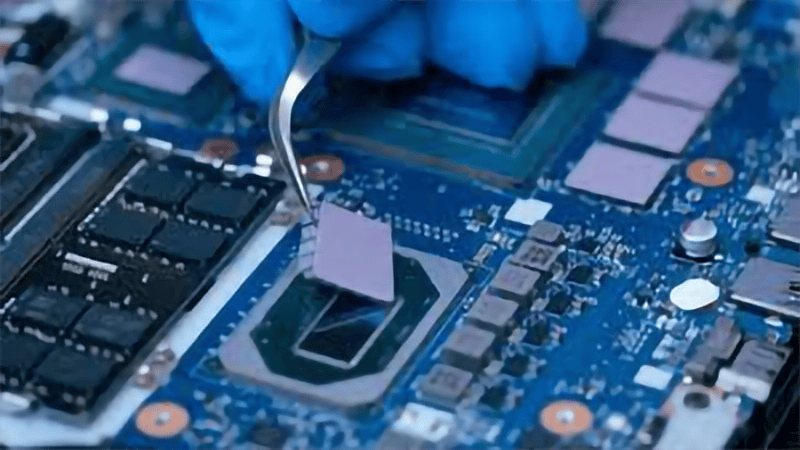
Controlled Compression Application
The goal is to create a thermal bridge, not a pressure clamp. Apply the 1.5mm pads to the battery management chips and the 2.0mm pads to the storage controller area. When placing the pads, ensure they do not overhang onto tiny SMD capacitors or connectors surrounding the main chips.
The “Squish Test” is the engineer’s validation method. When you verify the pads are placed, look at them from the side. They should be uniform. The key to Jiujutech pads is their low Shore hardness. They are designed to compress by approximately 20% when the case is closed. This compression ensures the pad conforms to the microscopic irregularities of the chip surface, maximizing heat transfer.
Reassembly and Tolerance Verification
Place the bottom lid back onto the chassis, but do not insert the screws immediately. Press down firmly in the center of the lid. It should sit flush with the unibody frame without excessive rocking. If the lid feels like it is balancing on a fulcrum, the pads are too thick or positioned incorrectly.
Begin tightening the screws from the center outward. If you encounter significant resistance or if the trackpad click feel changes, stop immediately. A stiff trackpad indicates that the case is bulging slightly and pressing against the trackpad mechanism from below. In this rare scenario, the internal tolerances of your specific unit may not support the standard pad thickness.
Standardized Testing Methodology
To validate the claims made in this guide, we adhere to a strict testing protocol rather than relying on anecdotal evidence. Our thermal lab data is derived under controlled conditions to minimize variables and ensure reproducibility.
- Ambient Environment: All tests are conducted in a climate-controlled room maintained at 22°C ±1°C to ensure consistent convective cooling potential.
- Power State: The MacBook Pro is connected to the official Apple 61W USB-C power adapter with the battery at 100% charge state to bypass battery charging heat, isolating the logic board thermal load.
- Thermal Saturation: We perform three consecutive 10-minute Cinebench R23 runs to ensure the chassis reaches “heat soak”.
- Why Cinebench: As recommended by Maxon, this tool provides a sustained 100% load on all cores, simulating the worst-case scenario for video rendering or code compilation.
- Margin of Error: Please note that internal on-die sensors have a variance of ±1°C. External IR measurements can be affected by surface emissivity changes.
Verifying the Thermal Delta
The success of this modification is measurable. Using software monitoring tools like TG Pro, establish a baseline before the mod and compare it with post-installation metrics.
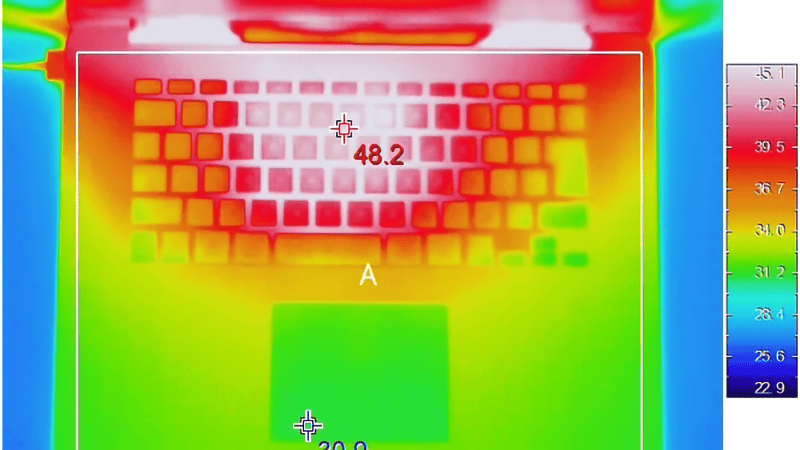
The Battery Metric: Under a heavy synthetic load, an unmodified M1 MacBook Pro will often see battery sensors reporting 40°C to 45°C. After the modification, these sensors should report a range of 30°C to 35°C. This delta is the primary indicator that the thermal bridge is active.
The Tactile Confirmation: The most obvious sign of success will be the temperature of the bottom case. Before the mod, the case usually stays cool while the internals heat up. After the mod, the case will get warm, or even hot, to the touch during heavy loads. This is a positive outcome; it proves that heat energy is being successfully evacuated from the delicate internal components and dissipated into the environment.
Critical Considerations and Use Cases
While this modification unlocks hidden efficiency, it changes the thermal behavior of the laptop in ways that may not suit every user.
User Profile Recommendations
Not every user benefits equally from this modification. Based on our deployment data, we have categorized recommendations:
- Video Editors & 3D Artists (Highly Recommended): The sustained loads of rendering create the exact heat soak conditions this mod solves. It is essential for preventing thermal throttling during long exports.
- Software Developers (Recommended): Compiling large codebases pushes all cores to 100%. Keeping the VRMs cool ensures stable power delivery during these spikes.
- Office & Admin Workers (Neutral): If your workflow is primarily email and spreadsheets, the M1 rarely generates enough heat to degrade the battery. The modification is safe but optional.
- Lap Users (Caution): Writers or users who strictly use the laptop on bare legs may find the increased chassis temperature uncomfortable.
Serviceability and Warranty
In many jurisdictions, opening a device does not inherently void the warranty unless damage occurs. According to the Federal Trade Commission and the Magnuson-Moss Warranty Act, manufacturers cannot void warranties simply because a user opened the device. However, service technicians are trained to identify unauthorized modifications. The advantage of using high-quality thermal pads is that they do not leave a sticky residue or permanent marks. If the device requires official service, the pads can be peeled off, and the surfaces cleaned with alcohol, returning the device to its factory state.
Take Control of Your Hardware. Do not let thermal inefficiencies dictate the lifespan of your device. Equip your workstation with materials engineered for reliability.
Explore Jiujutech MacBook M1 Thermal Solutions
Post-Installation Verification
How do you know it worked? You shouldn’t guess.
- Download Monitoring Tools: Use a tool like TG Pro or iStat Menus to monitor internal sensors.
- Run a Benchmark: Run Blackmagic Disk Speed Test or Cinebench.
- Watch the Delta: Before the mod, your battery temp would likely climb steadily with the CPU temp. After the mod, your CPU will get hot, but your battery should stay significantly cooler.
- Touch Test: Touch the bottom center of the laptop. It should get warm quickly. This proves the thermal bridge is active and heat is leaving the chassis.
FAQ and Troubleshooting
Can I use thermal paste instead?
Absolutely No. Thermal paste is designed for gaps less than 0.1mm. The gap between these chips and the chassis is 1.5mm to 2.0mm. Thermal paste cannot bridge this gap; it will pump out, make a mess, and fail to transfer heat. You need the structural integrity of a pad.
My trackpad feels stiff after the mod.
The case is slightly bulging and pressing against the trackpad mechanism from underneath. This means your pads are too thick (or the generic pads you bought have poor tolerances). Remove the pads immediately to prevent permanent damage to the haptic engine.
Does this work for M2/M3 chips?
The principle is the same, but the thickness requirements differ significantly due to changes in the logic board layout. Using M1 pads on an M2 can damage the device. Please Contact Us for M2/M3-specific kits.
Will this affect my Wi-Fi?
No. Jiujutech thermal pads are electrically non-conductive and non-capacitive. They do not interfere with antenna signals or Bluetooth connectivity.
Does this improve resale value?
Indirectly, yes. When you sell a MacBook, savvy buyers check the “Battery Cycle Count” and “Battery Health Percentage.” By keeping the battery cooler for years, you maintain a higher health percentage, making your device more valuable on the second-hand market.

